The first time I watched a sushi chef in Tokyo flip a roll inside-out with effortless precision, I knew this was an art form that demanded respect. Uramaki—the inside-out roll where rice forms the exterior rather than nori—was actually invented in Los Angeles during the late 1960s, yet it has become one of the most recognizable sushi styles worldwide. For home chefs willing to invest a little patience, the uramaki technique opens a dazzling world of color, texture, and creative freedom that traditional hosomaki simply cannot match.
Understanding Uramaki: A Brief History
The story of uramaki begins not in Japan but in Little Tokyo, Los Angeles, where a chef named Ichiro Mashita at Tokyo Kaikan restaurant faced a dilemma in the late 1960s. His American customers found the dark, papery nori wrapping unappealing and often peeled it off, leaving the rice and fillings to fall apart on their plates. His elegant solution was to invert the roll entirely—placing the nori on the inside and the rice on the outside. The California Roll was born, and with it, a revolution in how the West experienced sushi.
What makes uramaki particularly brilliant for home cooks is its visual versatility. Because the rice faces outward, you can press sesame seeds, tobiko (flying fish roe), or finely chopped herbs into the exterior, creating rolls that are as beautiful as they are delicious. The nori, hidden inside, softens from contact with the rice and fillings, becoming tender and less assertive in flavor—something many newcomers to sushi actually prefer.
"Sushi is not about raw fish. It is about rice. The word itself refers to the seasoned rice, and without perfect rice, there is no perfect sushi—no matter how exquisite the fish."
— Chef Jiro Ono
The Foundation: Perfect Sushi Rice
Before you even think about fillings or rolling technique, you must nail the rice. Sushi rice (shari or sumeshi) is a short-grain Japanese rice variety that becomes sticky when cooked, holding together without becoming gummy. The brand matters more than you might think—Koshihikari and Calrose are two widely available options that perform beautifully. Rinse the rice under cold water three to four times until the water runs nearly clear, then let it drain in a strainer for fifteen minutes before cooking.
Cook the rice with slightly less water than you would use for regular steamed rice—a ratio of about one part rice to 0.9 parts water produces the right firmness. Once cooked, transfer the rice immediately to a wide wooden bowl (hangiri), which absorbs excess moisture and cools the rice quickly. Fan the rice while folding in the seasoning—a mixture of rice vinegar, sugar, and salt dissolved in a small saucepan. The traditional ratio is four tablespoons of vinegar, two tablespoons of sugar, and one teaspoon of salt per two cups of uncooked rice, though I prefer slightly less sugar to let the rice's natural sweetness shine.
Chef's Tip
Never refrigerate your sushi rice before rolling. Cold rice becomes stiff and loses its adhesive quality. Keep it at room temperature, covered with a damp cloth, and use it within two hours of preparation. If the rice sits too long, it dries out and cracks when you try to roll.
The Seasoning Fold
The technique for incorporating the vinegar mixture is critical. Use a cutting motion with your rice paddle (shamoji), slicing through the rice at an angle rather than mashing or stirring. You want to coat each grain evenly without breaking them. The fanning simultaneously cools the rice and gives it a glossy sheen. This process should take about three minutes. Once seasoned, the rice should appear glossy, feel slightly tacky to the touch, and have a balanced sweet-tart flavor that complements rather than overpowers the fillings.
Nori: The Unsung Hero
Most home cooks underestimate the importance of nori quality. Cheap nori is brittle, flavorless, and tears easily during rolling. Invest in premium-grade nori, ideally labeled "gold" or "silver" grade, which comes in thicker, more pliable sheets with a deep green-black color and a subtle oceanic sweetness. Store nori in an airtight container with a desiccant packet—humidity is its greatest enemy, turning crisp sheets into chewy, unworkable messes.
For uramaki, you will use a full sheet of nori placed rough side up on your bamboo mat. The rough side grips the rice, while the smooth side faces the fillings. A common beginner mistake is using too much rice, which makes the roll bloated and difficult to cut. Aim for a layer roughly one-eighth inch thick, leaving about a half-inch strip of nori exposed at the top edge—this bare strip will seal the roll when you complete it.
Mastering the Bamboo Mat (Makisu)
The makisu, or bamboo rolling mat, is your most essential tool. Wrap yours tightly in plastic wrap before starting—this prevents rice from sticking to the bamboo and makes cleanup effortless. Place the nori on the mat, then spread your rice evenly across the surface using wetted fingertips. Dip your fingers in water mixed with a splash of vinegar (tezu) before each contact with the rice to prevent sticking.
Here is where the uramaki technique diverges from traditional rolling. Once your rice is spread, sprinkle your exterior coating—sesame seeds, tobiko, or masago—across the entire rice surface. Then, carefully flip the entire nori-and-rice sheet over so the rice faces down on the plastic-wrapped mat. Now the nori faces up, and you arrange your fillings in a horizontal line about one inch from the bottom edge. This inversion is what gives uramaki its signature rice-outside appearance.
The Rolling Motion
- Lift the mat edge: Use your thumbs to lift the bottom edge of the mat over the fillings, curling it forward until the rice edge meets the far side of the rice layer.
- Squeeze gently: Apply even, gentle pressure along the length of the mat to shape the roll into a firm cylinder. Do not press too hard or the fillings will squeeze out.
- Complete the roll: Lift the mat and continue rolling forward to close the cylinder. The exposed strip of nori at the top will seal against the rice.
- Shape and set: Wrap the finished roll in the mat and let it rest for one minute before cutting. This helps the roll hold its shape.
Popular Fillings and Flavor Combinations
The beauty of uramaki lies in its filling flexibility. While traditionalists may raise an eyebrow, the inside-out format was born from creative adaptation, so there is no reason to hold back. That said, balance is everything. A great roll combines textures—creamy, crunchy, soft, and firm—and flavors that complement rather than compete.
- Classic California: Imitation crab (kani kamaboko), ripe avocado, and cucumber. The creaminess of avocado against the crunch of cucumber is timeless for good reason.
- Spicy Tuna: Finely diced sushi-grade tuna tossed in spicy mayo (Kewpie mayo mixed with sriracha), topped with sliced scallions. Add tempura flakes for extra crunch.
- Rainbow Roll: A California roll base topped with thin slices of assorted sashimi-grade fish—salmon, tuna, yellowtail, and shrimp—arranged across the exterior before cutting.
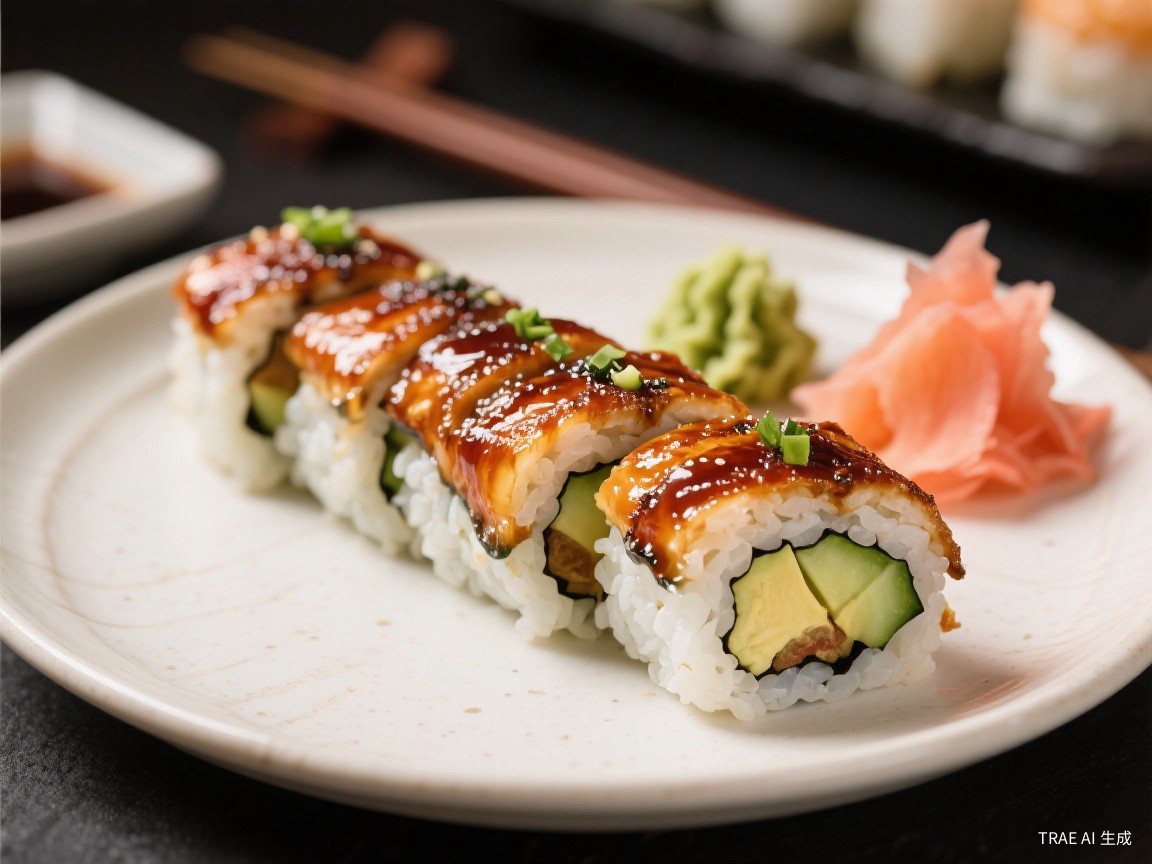
- Dragon Roll: Eel and cucumber inside, with overlapping slices of avocado on the exterior, finished with eel sauce and toasted sesame seeds.
- Philadelphia Roll: Smoked salmon and cream cheese with cucumber. Rich and indulgent, this roll bridges Western and Japanese flavor profiles beautifully.
Knife Work: The Final Test
Even a perfectly rolled uramaki can be ruined by careless cutting. Use a long, sharp knife—ideally a dedicated sushi knife (yanagiba), though a sharp chef's knife works fine. Wet the blade with a damp cloth before each cut to prevent sticking. Cut the roll in half first, then align the two halves side by side and cut them simultaneously into six or eight pieces. This method keeps the portions even and prevents the roll from squishing under uneven pressure.
Wipe the blade clean between every single cut. Rice residue on the knife creates drag, tearing the nori and mangling the fillings. It is tedious, but this attention to detail is what separates home sushi that looks professional from home sushi that looks like a kitchen accident.
Serving and Enjoying
Arrange your cut rolls on a plate or traditional wooden geta board. Serve with pickled ginger (gari), wasabi, and soy sauce—but remember that wasabi should be mixed into the soy sauce sparingly, if at all. In Japan, the proper way is to place a small dab of wasabi directly on the fish, then dip the fish side into the soy sauce, rice side up. The rice should never touch the soy sauce, as it absorbs liquid like a sponge and will fall apart.
For a complete home sushi experience, pair your rolls with a simple miso soup, a small plate of edamame, and perhaps some sunomono (cucumber salad) to cleanse the palate between rolls. A cold sake or a crisp Japanese beer like Asahi or Sapporo rounds out the meal beautifully.
Ready to Roll Your Own?
Download our free sushi rice timing guide and filling combination chart for your next home sushi night.
Get the Free Guide